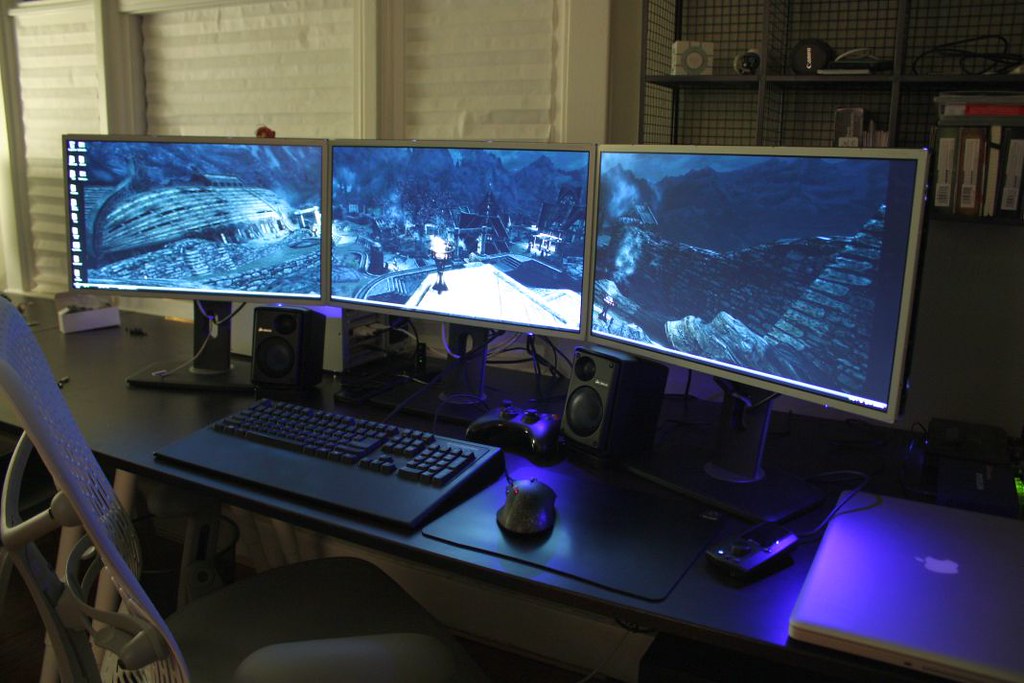
Bezel-less DIY. Also valuable for users with "floating box" type panels. (eg. Dell u2312HMt)
Posted: 05 Dec 2011, 01:58
Disclaimer: By reading this guide and performing any action herein, you agree that WSGF's or myself, will not be held responsible for any damages that may be caused due to improper handling or care of your LCD panel when attempting to follow this guide. Also, you're fully aware and for the most part completely comfortable with the thought of voiding the manufacturers warranties. With that said, please be careful.
Note: I am not an expert in the electronics industry, just a helpful IT guy who loves to mod anything and everything. If I label anything incorrectly, please feel free to correct me, I won't be offended.
If you would like to post your specific LCD panel de-bezeling instructions, please feel free to do so, it would be nice to have a compilation of different monitors and how they look when properly disassembled and setup.
Why would someone want to remove the bezel?
It can drastically reduce the black space between multiple displays.

vs

See the difference?


Nuff said.
What do you mean by "Floating Box"?
On the full size panels that contain an internal power supply, there is metal box that may or may not be firmly attached to the backside of an LCD panel. This is typically the underlying part where the VESA mount attaches to the panel. The VESA mount will still attach correctly, but your monitor may be holding on by some small pieces of tape, which is not ideal and could result in a costly disaster.
This image, stolen from here, courtesy of ADSTA, shows a perfect example of how much fail this design is for people that want to go bezel-less. In order for the panel to remain safely attached, once mounted, the panel needs to stay in it's original enclosure otherwise the VESA mount will only hold the power-supply and not the panel it is weakly taped to (See those two black peices of tape? There is most likely a 3rd one up top and that's it). This means that the LCD panel may or may not just fall off during regular usage.

This image, stolen from here, courtesy of Gunja, shows a very thick monitor. However, as thick as this monitor may be, you can see up top that the panel is securely fastened to a back panel by four screws (two up top, two on the bottom - most likely), which is then safely attached to the power supply box with the exposed VESA mounting holes.

This DIY is directed towards people that may have a floating box type panel, although other users may find this DIY of value to them as well.
Estimated time needed to invest in order to properly perform this DIY: No more than 2hours for all three monitors
Tools required
1. Phillips head screw driver.
2. Some smaller, more agile fingers. (I will apologize in advance to you fat fingered individuals)
3. Industrial Strength Metal Repair Tape $5 at your local hardware store.
4. The will to tear apart your precious monitor. This one is important.
Ok, Let's do this!
Advice:
Remove all jewelry on your fingers before starting the procedure. I will remind you again later.
Step 1: Prep the patient
Gently disconnect all cables from your monitor (power, video, usb, audio, etc) and remove the monitor stand that is attached to the backside of your panel.
If you're using a VESA mount, please remove the monitor from the desk mount that you're using.
Step 2: Put the patient on a clean operating table
Place the monitor on its back on top of a secure surface, such as a clean desk or a clean dining room table. My wood IKEA desk did me just fine, although if you would like to put down a towel before resting your monitor, please do so. Ensure that the surface is clean of debris otherwise you may scratch your LCD panel when you put it face down. If you have long nails or jewelry on your fingers, please remove all jewelry and place a small hand towel on your LCD screen to prevent as many fingerprints as possible.
Step 3: Open the patient
NOTE: If there are no obvious ways to dissemble your monitor (eg. Screws), please use Google to determine the proper way to disassemble your monitor. Otherwise, try the method below. Youtube may even be a valuable resource if someone has posted a teardown video of your monitor.
Most screens have a piece of plastic that surrounds the panel when you're looking directly at it. With the monitor laying securely on its back, gently take your three middle fingers from both hands, place all six fingers directly on the screen and attempt to get your fingers under the plastic surround. If you gently pry at it (with up to ~20lbs of force), it will pop off, please do not worry too much about damaging the panel with such force, they can handle the pressure. Once your fingers are under the plastic surround, slowly ease your way around the monitor until you have completely removed the plastic surround
Please be very careful when you're near the area of your panel that contains the buttons, most of them are only connected by a ribbon cable. Some of these little circuit boards can simply be extracted from the plastic surround, others require that they are unscrewed from the plastic surround. If your buttons are built into the bottom, they may be fastened to the piece of plastic on the backside of your monitor. Find which method your monitor requires and perform the necessary actions so that the plastic surround can be set aside. With that piece of plastic removed, please make sure that your panel is still securely fastened to the back piece of plastic before continuing.
Now, gently place your monitor on it's face.
Looking at the backside of your monitor, hunt for some screws that may be connected to the metal around your internal power supply, aka that "Floating Box".
I found 4 of them

and removed them

If your monitor has no screws to be found, please research how to remove the back panel, I will not provide further advise that may steer you in the wrong direction.
Going forward, your monitor should be free of all plastic and look something like this:


Here are some examples of how the floating box was poorly attached to my panel


The next few steps may apply to your monitor but are specifically written for Dell u2312HMt users
Step 4: Lipo / Weight reduction
Remove the USB ports from the left side of the monitor by unplugging the ribbon cable. Don't be shocked, If you're running three monitors, you most likely have no use for the 4 USB ports that are blocked by the adjacent monitor anyway. Also worth noting is that their is a large metal tab that will prevent your triple monitor setup from looking complete. Please do not skip this step! Keep in mind that there are still 6 USB ports on the underside of the panel, we will not be removing those.


Step 5: Bandage the patient
If you would like to, you can reuse the metal tape that was on the USB adapter anywhere on the panel - like so:

I wasn't too happy with just one additional strip of metal tape holding up my $300 investment (and neither should you!) so I took a trip to Ace Hardware for this:

The tape is good for up to 230degrees Fahrenheit, so their is no need to worry about the adhesive softening due to panel heat, like other types of tape.
It is also HVAC industrial strength so it can hold a lot of weight with just a few strips of tape. This particular tape is ideal for fastening the floating box to the back of a panel. In fact, this tape is so desired that it is the same type of tape that is already used by most display manufactures.
As you can see, it's not going anywhere...


While your at it, find a secure place to position your LCD buttons

Set aside the panel on a flat surface, face down, in a safe and secure area before proceeding.
Step 6: Cut out some more fat *Dell u2312HMt users
Grab the back part of the monitor and remove the matte silver plastic trim that made the bezel so thick in the first place.

Now you should just see the back piece of plastic in it's naked form:

Step 7: Stitch the patient *Dell u2312HMt users
Take that back piece and place it over the rear of the monitor:
Screw it back together

Step 8: Revive the patient and move onto the next
At this time you can reattach the monitor stand, all cables, and move on to the other two monitors. Now that you understand how to do it to one monitor, monitor 2 and monitor 3 should be a breeze.
Let's see the end result, shall we?


The blue glow was created with the relocation of the power button to the underside of the panel. It is actually much softer in real life, the photo over-exaggerated the blue light in this picture.

But how well does it game?
With Eyefinity bezel compensation my computer does Windows and Games at 5992x1080


Dirt 3

The bezel compensation works wonders in Dirt 3


Skyrim

Skyrim won't load at 5992x1080, just 5760x1080 which means that bezel compensation is slightly off. It's barely noticeable, but it certainly exists if you look for it.

Team Fortress 2

The bezel compensation works amazingly in Team Fortress 2 as well (no UI mod installed... yet)

Anyway, I hope that you're successful in de-bezeling your monitors. I also hope that many people find this DIY of some use to them. I spent many hours typing up this DIY (I don't have Word, so I am sure there are many errors) and I look forward to your responses and possible contributions.
Thank you so much for reading,
Drew
Note: I am not an expert in the electronics industry, just a helpful IT guy who loves to mod anything and everything. If I label anything incorrectly, please feel free to correct me, I won't be offended.
If you would like to post your specific LCD panel de-bezeling instructions, please feel free to do so, it would be nice to have a compilation of different monitors and how they look when properly disassembled and setup.
Why would someone want to remove the bezel?
It can drastically reduce the black space between multiple displays.
vs
See the difference?
Nuff said.
What do you mean by "Floating Box"?
On the full size panels that contain an internal power supply, there is metal box that may or may not be firmly attached to the backside of an LCD panel. This is typically the underlying part where the VESA mount attaches to the panel. The VESA mount will still attach correctly, but your monitor may be holding on by some small pieces of tape, which is not ideal and could result in a costly disaster.
This image, stolen from here, courtesy of ADSTA, shows a perfect example of how much fail this design is for people that want to go bezel-less. In order for the panel to remain safely attached, once mounted, the panel needs to stay in it's original enclosure otherwise the VESA mount will only hold the power-supply and not the panel it is weakly taped to (See those two black peices of tape? There is most likely a 3rd one up top and that's it). This means that the LCD panel may or may not just fall off during regular usage.
This image, stolen from here, courtesy of Gunja, shows a very thick monitor. However, as thick as this monitor may be, you can see up top that the panel is securely fastened to a back panel by four screws (two up top, two on the bottom - most likely), which is then safely attached to the power supply box with the exposed VESA mounting holes.
This DIY is directed towards people that may have a floating box type panel, although other users may find this DIY of value to them as well.
Estimated time needed to invest in order to properly perform this DIY: No more than 2hours for all three monitors
Tools required
1. Phillips head screw driver.
2. Some smaller, more agile fingers. (I will apologize in advance to you fat fingered individuals)
3. Industrial Strength Metal Repair Tape $5 at your local hardware store.
4. The will to tear apart your precious monitor. This one is important.
Ok, Let's do this!
Advice:
Remove all jewelry on your fingers before starting the procedure. I will remind you again later.
Step 1: Prep the patient
Gently disconnect all cables from your monitor (power, video, usb, audio, etc) and remove the monitor stand that is attached to the backside of your panel.
If you're using a VESA mount, please remove the monitor from the desk mount that you're using.
Step 2: Put the patient on a clean operating table
Place the monitor on its back on top of a secure surface, such as a clean desk or a clean dining room table. My wood IKEA desk did me just fine, although if you would like to put down a towel before resting your monitor, please do so. Ensure that the surface is clean of debris otherwise you may scratch your LCD panel when you put it face down. If you have long nails or jewelry on your fingers, please remove all jewelry and place a small hand towel on your LCD screen to prevent as many fingerprints as possible.
Step 3: Open the patient
NOTE: If there are no obvious ways to dissemble your monitor (eg. Screws), please use Google to determine the proper way to disassemble your monitor. Otherwise, try the method below. Youtube may even be a valuable resource if someone has posted a teardown video of your monitor.
Most screens have a piece of plastic that surrounds the panel when you're looking directly at it. With the monitor laying securely on its back, gently take your three middle fingers from both hands, place all six fingers directly on the screen and attempt to get your fingers under the plastic surround. If you gently pry at it (with up to ~20lbs of force), it will pop off, please do not worry too much about damaging the panel with such force, they can handle the pressure. Once your fingers are under the plastic surround, slowly ease your way around the monitor until you have completely removed the plastic surround
Please be very careful when you're near the area of your panel that contains the buttons, most of them are only connected by a ribbon cable. Some of these little circuit boards can simply be extracted from the plastic surround, others require that they are unscrewed from the plastic surround. If your buttons are built into the bottom, they may be fastened to the piece of plastic on the backside of your monitor. Find which method your monitor requires and perform the necessary actions so that the plastic surround can be set aside. With that piece of plastic removed, please make sure that your panel is still securely fastened to the back piece of plastic before continuing.
Now, gently place your monitor on it's face.
Looking at the backside of your monitor, hunt for some screws that may be connected to the metal around your internal power supply, aka that "Floating Box".
I found 4 of them
and removed them
If your monitor has no screws to be found, please research how to remove the back panel, I will not provide further advise that may steer you in the wrong direction.
Going forward, your monitor should be free of all plastic and look something like this:
Here are some examples of how the floating box was poorly attached to my panel
The next few steps may apply to your monitor but are specifically written for Dell u2312HMt users
Step 4: Lipo / Weight reduction
Remove the USB ports from the left side of the monitor by unplugging the ribbon cable. Don't be shocked, If you're running three monitors, you most likely have no use for the 4 USB ports that are blocked by the adjacent monitor anyway. Also worth noting is that their is a large metal tab that will prevent your triple monitor setup from looking complete. Please do not skip this step! Keep in mind that there are still 6 USB ports on the underside of the panel, we will not be removing those.
Step 5: Bandage the patient
If you would like to, you can reuse the metal tape that was on the USB adapter anywhere on the panel - like so:
I wasn't too happy with just one additional strip of metal tape holding up my $300 investment (and neither should you!) so I took a trip to Ace Hardware for this:
The tape is good for up to 230degrees Fahrenheit, so their is no need to worry about the adhesive softening due to panel heat, like other types of tape.
It is also HVAC industrial strength so it can hold a lot of weight with just a few strips of tape. This particular tape is ideal for fastening the floating box to the back of a panel. In fact, this tape is so desired that it is the same type of tape that is already used by most display manufactures.
As you can see, it's not going anywhere...
While your at it, find a secure place to position your LCD buttons
Set aside the panel on a flat surface, face down, in a safe and secure area before proceeding.
Step 6: Cut out some more fat *Dell u2312HMt users
Grab the back part of the monitor and remove the matte silver plastic trim that made the bezel so thick in the first place.
Now you should just see the back piece of plastic in it's naked form:
Step 7: Stitch the patient *Dell u2312HMt users
Take that back piece and place it over the rear of the monitor:
Screw it back together
Step 8: Revive the patient and move onto the next
At this time you can reattach the monitor stand, all cables, and move on to the other two monitors. Now that you understand how to do it to one monitor, monitor 2 and monitor 3 should be a breeze.
Let's see the end result, shall we?
The blue glow was created with the relocation of the power button to the underside of the panel. It is actually much softer in real life, the photo over-exaggerated the blue light in this picture.
But how well does it game?
With Eyefinity bezel compensation my computer does Windows and Games at 5992x1080
Dirt 3
The bezel compensation works wonders in Dirt 3
Skyrim
Skyrim won't load at 5992x1080, just 5760x1080 which means that bezel compensation is slightly off. It's barely noticeable, but it certainly exists if you look for it.
Team Fortress 2
The bezel compensation works amazingly in Team Fortress 2 as well (no UI mod installed... yet)
Anyway, I hope that you're successful in de-bezeling your monitors. I also hope that many people find this DIY of some use to them. I spent many hours typing up this DIY (I don't have Word, so I am sure there are many errors) and I look forward to your responses and possible contributions.
Thank you so much for reading,
Drew