Welcome to this build log and review of my new Corsair Obsidian 250D Mini ITX rig. I would like to start off with a great thanks to Jacob Freeman and EVGA for helping to support this build and the WSGF. They provided both the EVGA Z170 Stinger Mini-ITX motherboard, and the SuperNOVA 1050 GS Power Supply. Thanks again, your support and patience is greatly appreciated.
You can watch the build log and review on YouTube, or read below if you prefer the printed word. I've embedded some screen caps from the video into the article. You can click on each one to ebmiggen.
Introduction
For a couple of years, my gaming rig has comprised of an AMD FX-9590 and Radeon R9 295x2. This has all been housed in a Cooler Master HAF XB EVO. Overall the rig performed well, but I had grown weary of the heat and noise it produced.
For this build my goals were:
Move to a cooler, quieter platform that would make gaming more enjoyable. Both the noise and heat generated in my closed office (compounded by the Texas heat) had made gaming something I didn’t enjoy as much as I used to.
Reduce the physical footprint of the rig. I’ve been keeping my PC on my desk to make it more accessible, so I wanted to reduce the amount of space the new PC takes up.
Have a smoother more consistent gameplay experience. Multi-GPU rigs can be great, but they can present problems with either bad GPU scaling or micro-stutter. To get a more consistent experience between games, and within a game, I’m moving to a single-GPU. This will also help with the noise and heat issues.
Not overbuild or overbuy. Too many times I’ve selected components with ideas for what I might do some day. Rarely if ever did these plans come to fruition. So the goal was to build the best system for my current needs and current use – not spend extra money for capabilities I might never leverage.
For this build log, I will go through each major component and discuss my decision process for choosing that component, the installation experience, and its performance.
Major Component Selection & Build Log
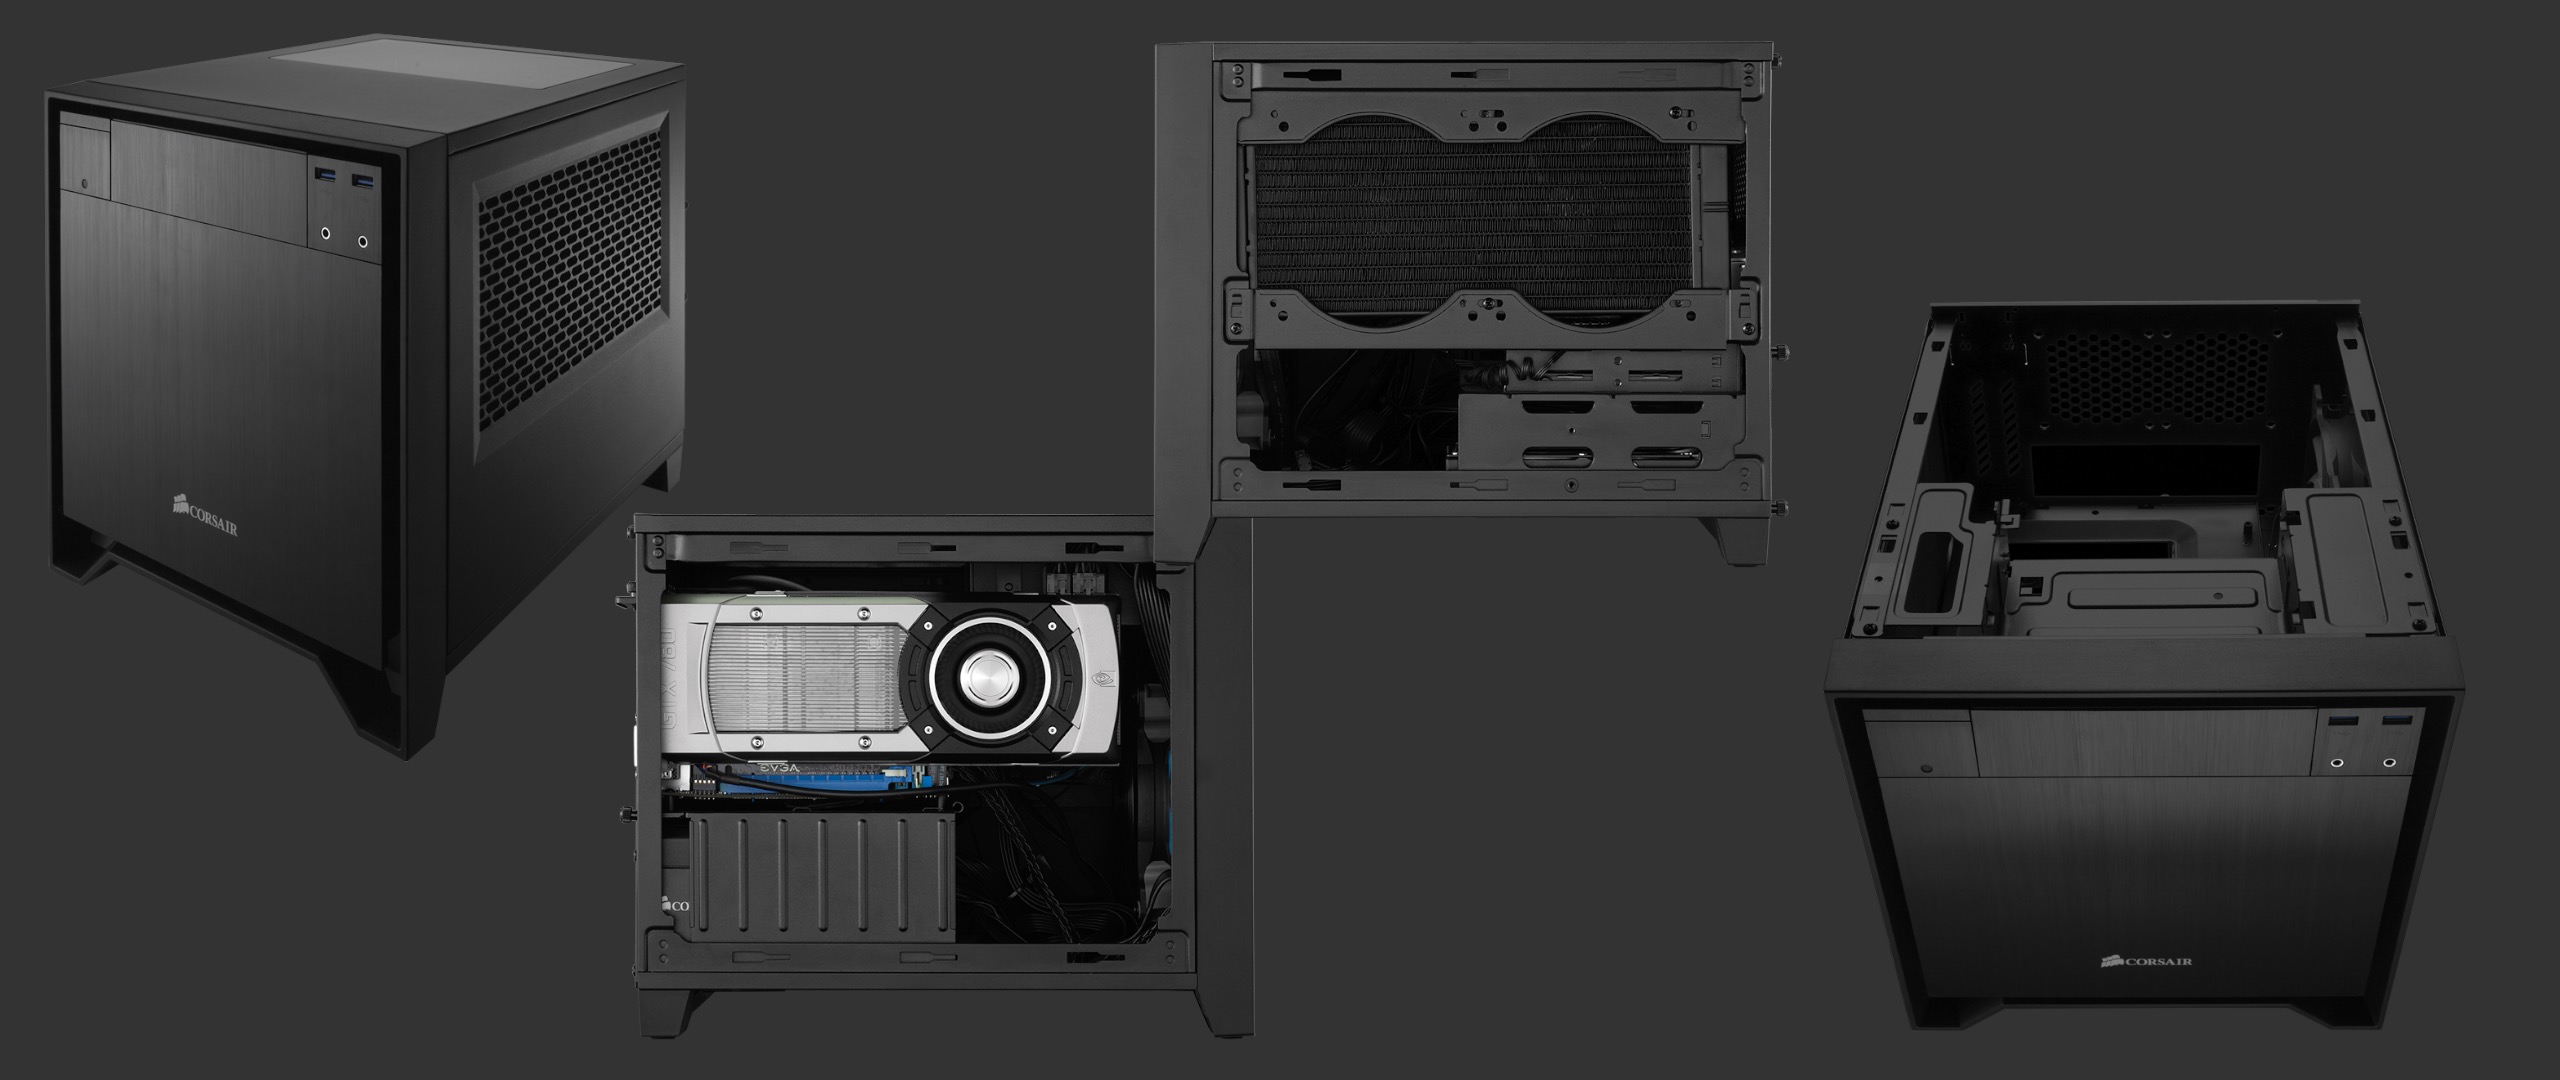
Case - Corsair Obsidian 250D Mini-ITX
For the case I chose the Corsair Obsidian 250D Mini-ITX case. Despite its small size it supports a number of enthusiast features such as full-size GPUs and ATX power supplies, and support for 240mm closed-loop radiators.
The 250D also supports four drives, and even has a bay for an optical drive. I have no intentions to use an optical drive, but the front-bay gives the option of using a GPU designed for VR, which includes a front-bay panel for HDMI and USB connectivity.
One last reason for choosing the 250D is that is uses a top-loading design for GPUs, with easy access through removable top and side panels. This will make it easy to swap out GPUs, as I intend to get back into benchmarking and testing.
The first step in the build was removing the top and side panels, the two included internal fans, the front filter, and the optical drive bracket. Having stripped the chassis to the bare frame, it was ready for parts.
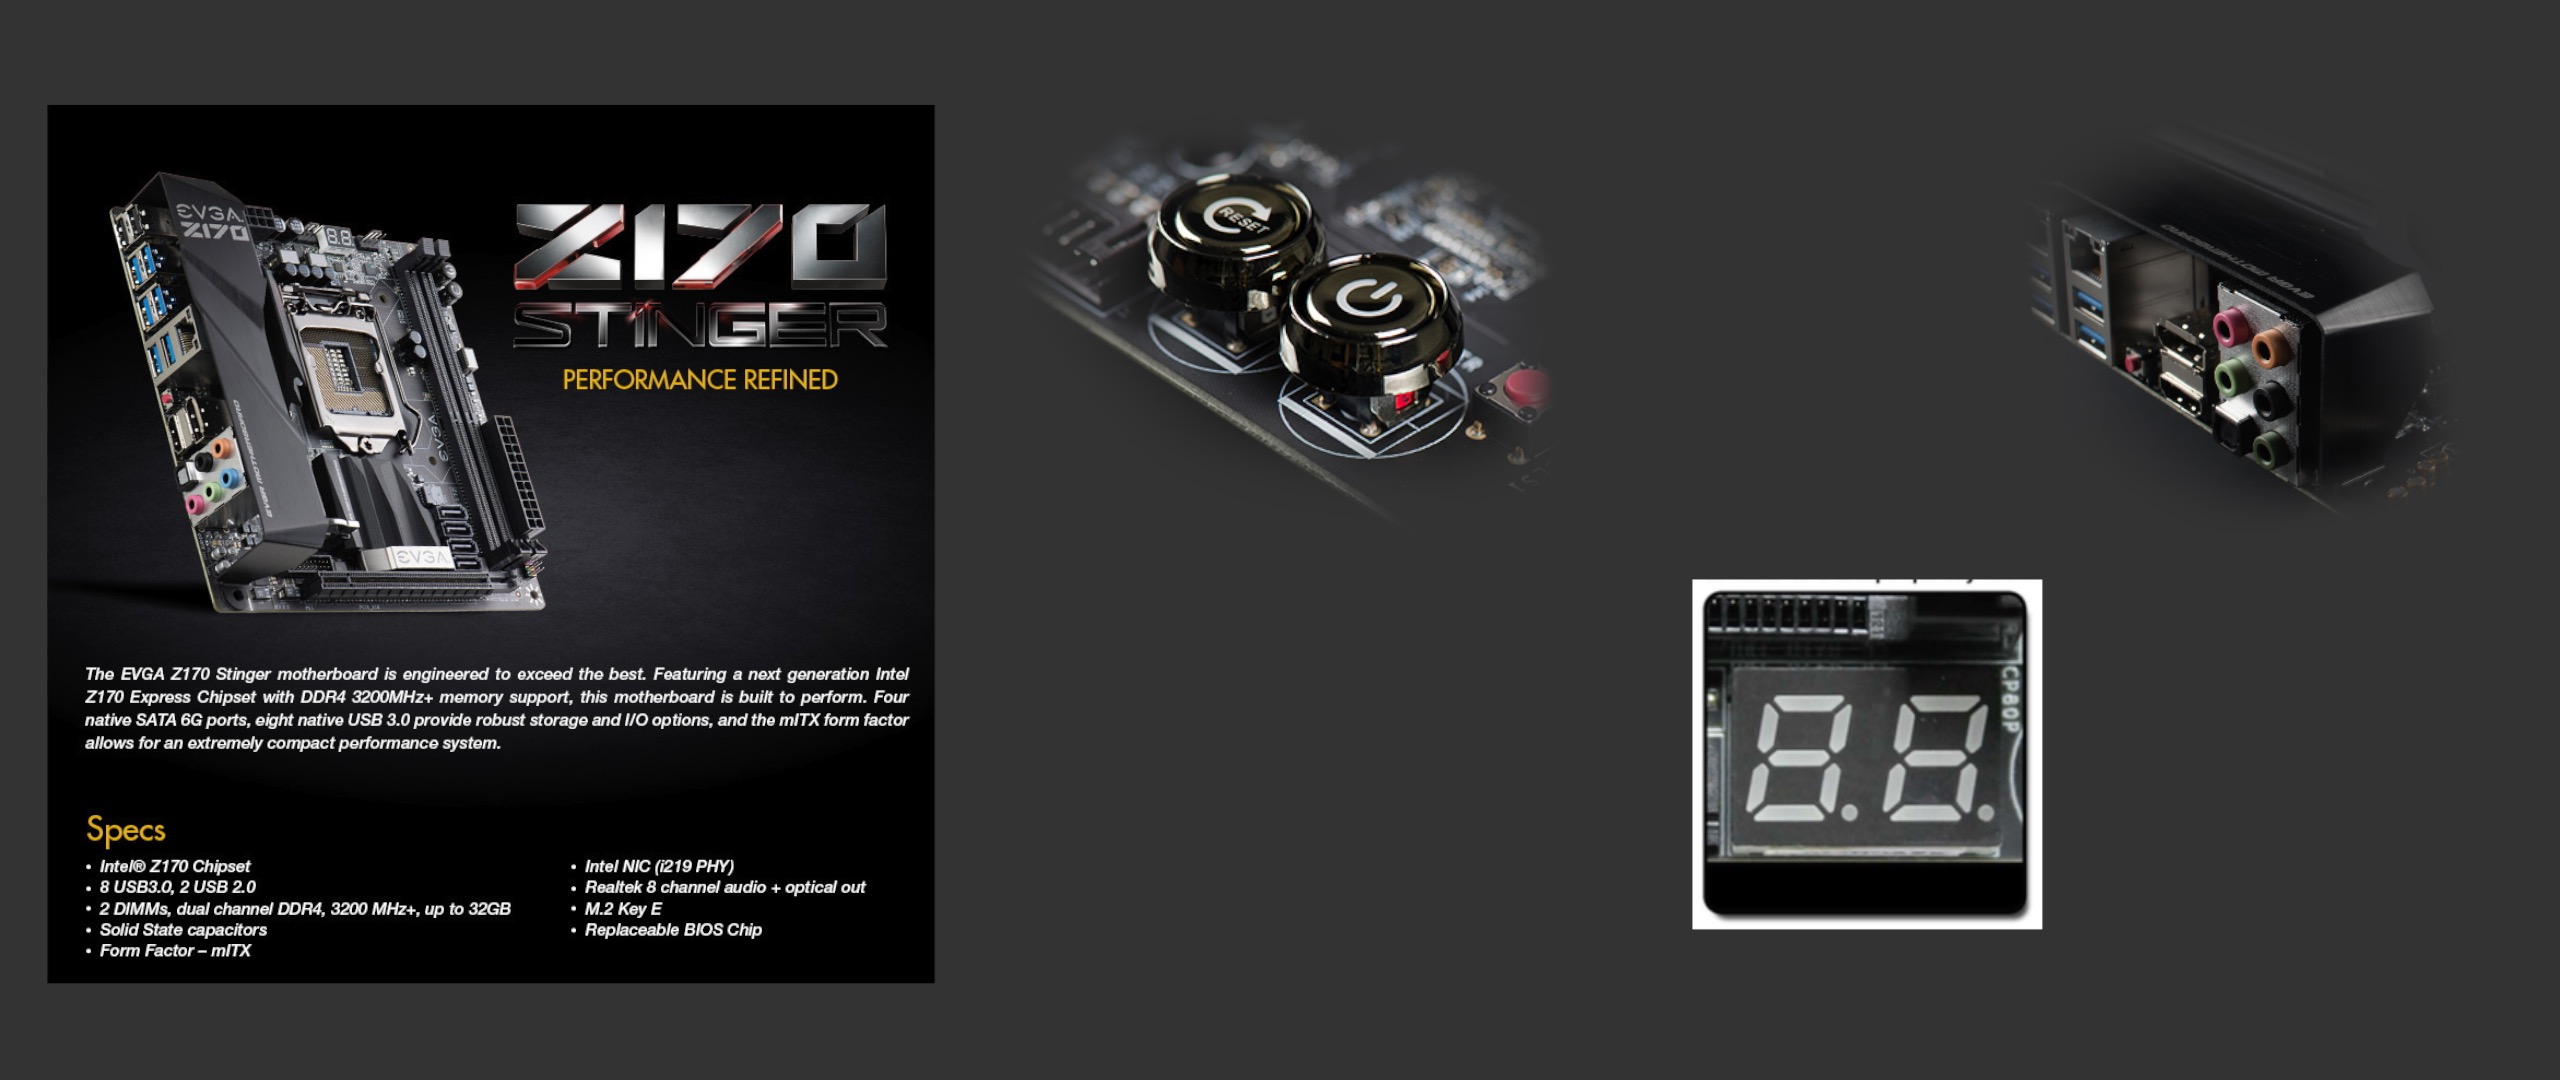
Motherboard - EVGA Z170 Stinger
In looking around the web for Mini-ITX motherboards, I found that the EVGA Z170 Stinger was well reviewed, and competitively priced. It also had a number of features I really liked, including the LED Debug, the onboard power/reset buttons, and the BIOS reset on the back panel. The LED Debug panel actually helped me troubleshoot an odd DisplayPort cable grounding issue. You can see a video of that here.
Mini-ITX motherboards are always a matter of give and take on features, due to their small size. There are a few limitations on the board to be aware of. It only has three fan headers – one for CPU and two for chassis fans. Also, there are no USB 2.0 headers on the motherboard. If you’re looking to use something like Corsair Link or an LED light strip, you’ll be out of luck.
In my previous looks at CPU gaming performance, here at the WSGF, I found that the top-end CPUs really offered no discernable performance difference in-game, when compared to just one step “down”. In reading reviews of the i5-6600K, this was confirmed to still be true. The $100 saved on the CPU paid for the 16GB of DDR4 G.Skill RAM that I needed.
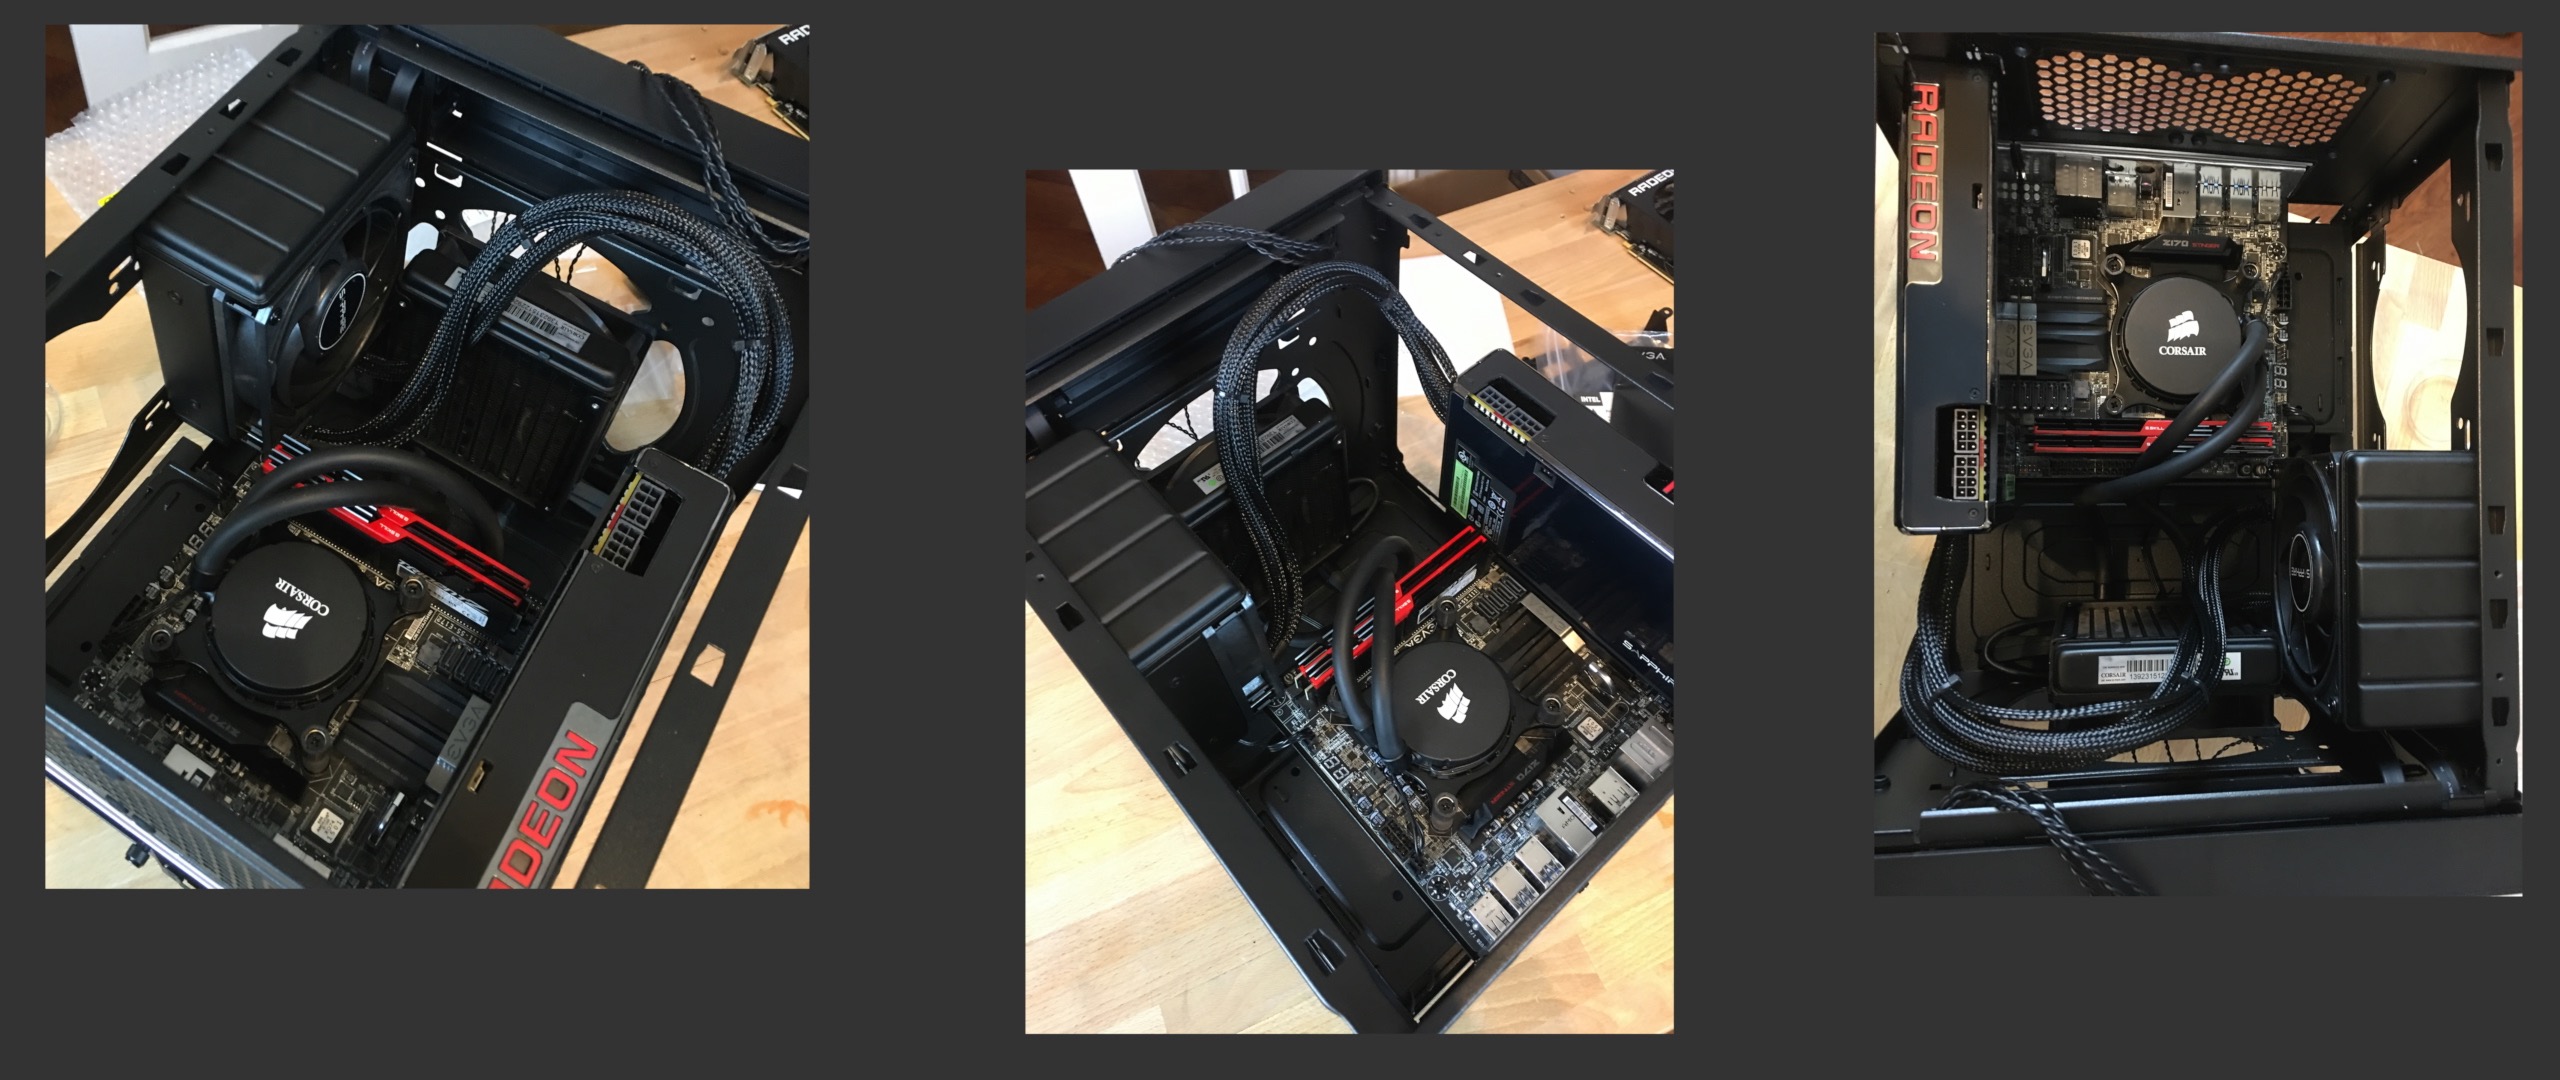
CPU Cooling - Corsair H100i v2 (My First Problems)
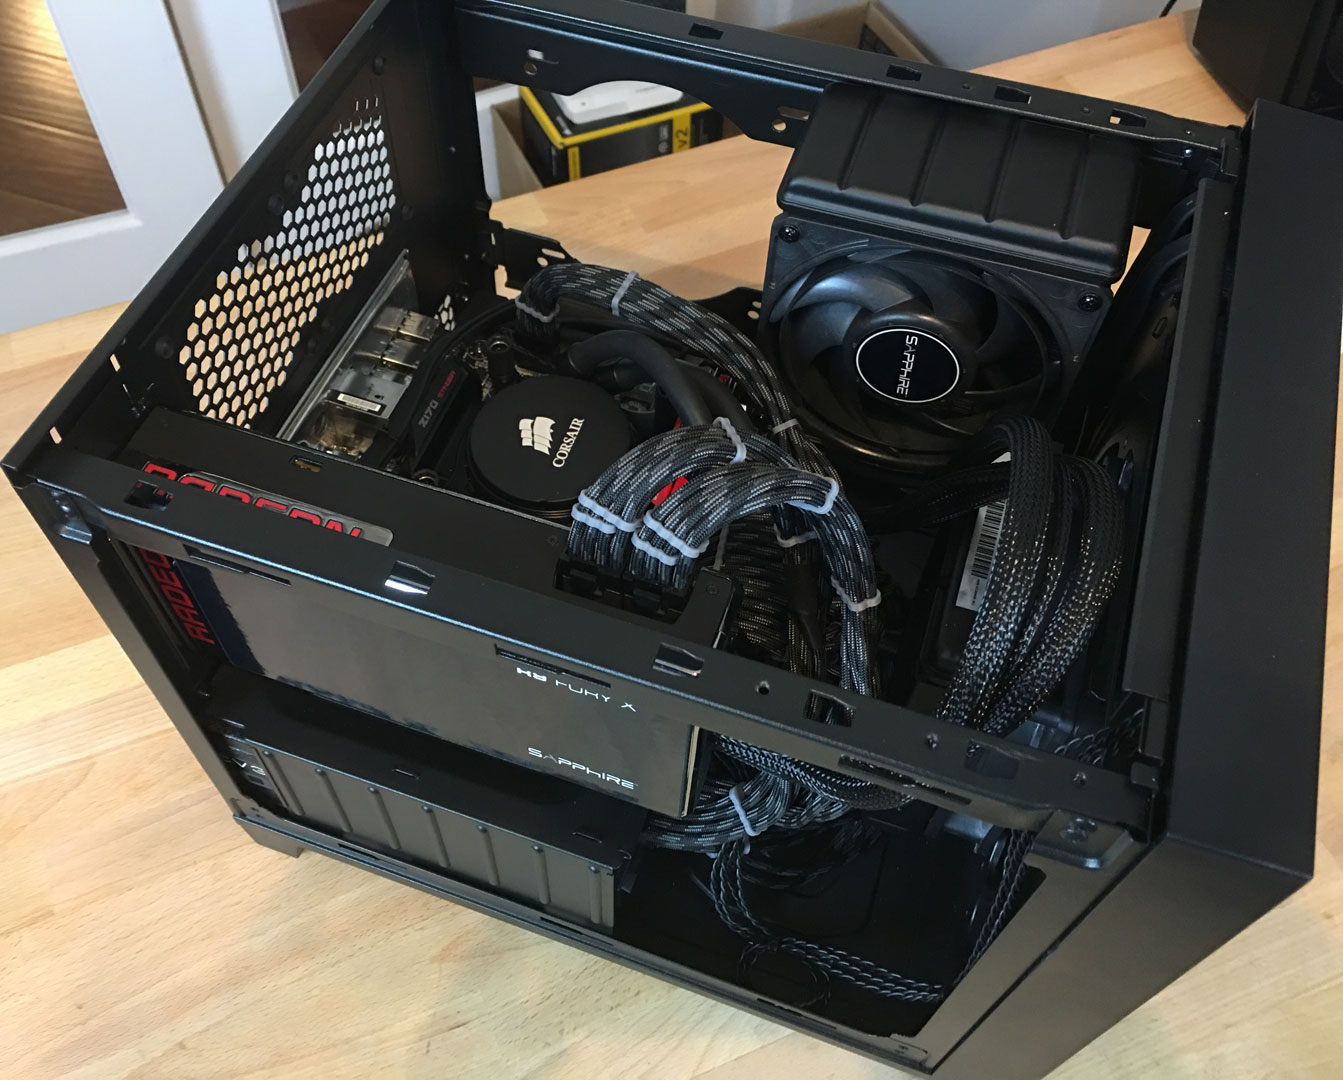
For CPU cooling, I went with the Corsair H100i v2. Here it is with the motherboard, and a dry-fit test, after I had swapped out the stock fans for a pair of Corsair SP120 Quiet fans I already had on hand. And this is where I ran into my first problem. You’ll notice in this picture that the fans protrude out far enough to sit on top of the motherboard standoffs, and won’t allow the motherboard to fit inside the case.
I was completely flummoxed by this. The Corsair site says specifically that the H100i fits in the Corsair 250D. Corsair lists both the H100i and H100i v2 units as current on its website, and lists the radiator size as the same for both - 240 x 25mm. When you look at Amazon, the H100i is clearly more expensive, and only available from 3rd Party Sellers.
The cheaper, newer, “current” model – which Corsair bills as a better cooler, was available directly from Amazon and seemed like the unit to get. But, in the end the, the H100i v2 simply will not work.
This was confirmed after extensive online research where system builders claim both that the H100i does and does not fit in the 250D. The end result of every discussion ends up in clarifying that the v1 will fit, but the v2 will not. I think that Corsair needs to make this clearer on the product page for the Obsidian 250D, given that the H100i v1 is much harder to find and will end up being more expensive.
Now without a CPU cooler, I set to find something that would work. Corsair bills both the H100i and the H55 Quiet 2.5 stars (out of five) for cooling performance, and claims that the H55 Quiet offers, quote – “Solid performance for gaming PCs”.
Given that the Skylake i5-6600K is a cool running chip, I wasn’t planning to overclock, and I was going for a quiet build, the H55 Quiet seemed the way to go. After a trip to Fry’s, I had the new unit in hand.
Once back to the workbench, it was time to start dry-fitting again. The hoses for closed-loop coolers tend to have a natural bend and twist to them. With the CPU cooler on the side, and the GPU cooler in the front, I found that I was constantly fighting these naturals bends and twists, and not happy with the force being applied to the ends and connectors. Once I decided to swap the locations, everything fell into place.
PSU - EVGA SuperNOVA 1050 GS
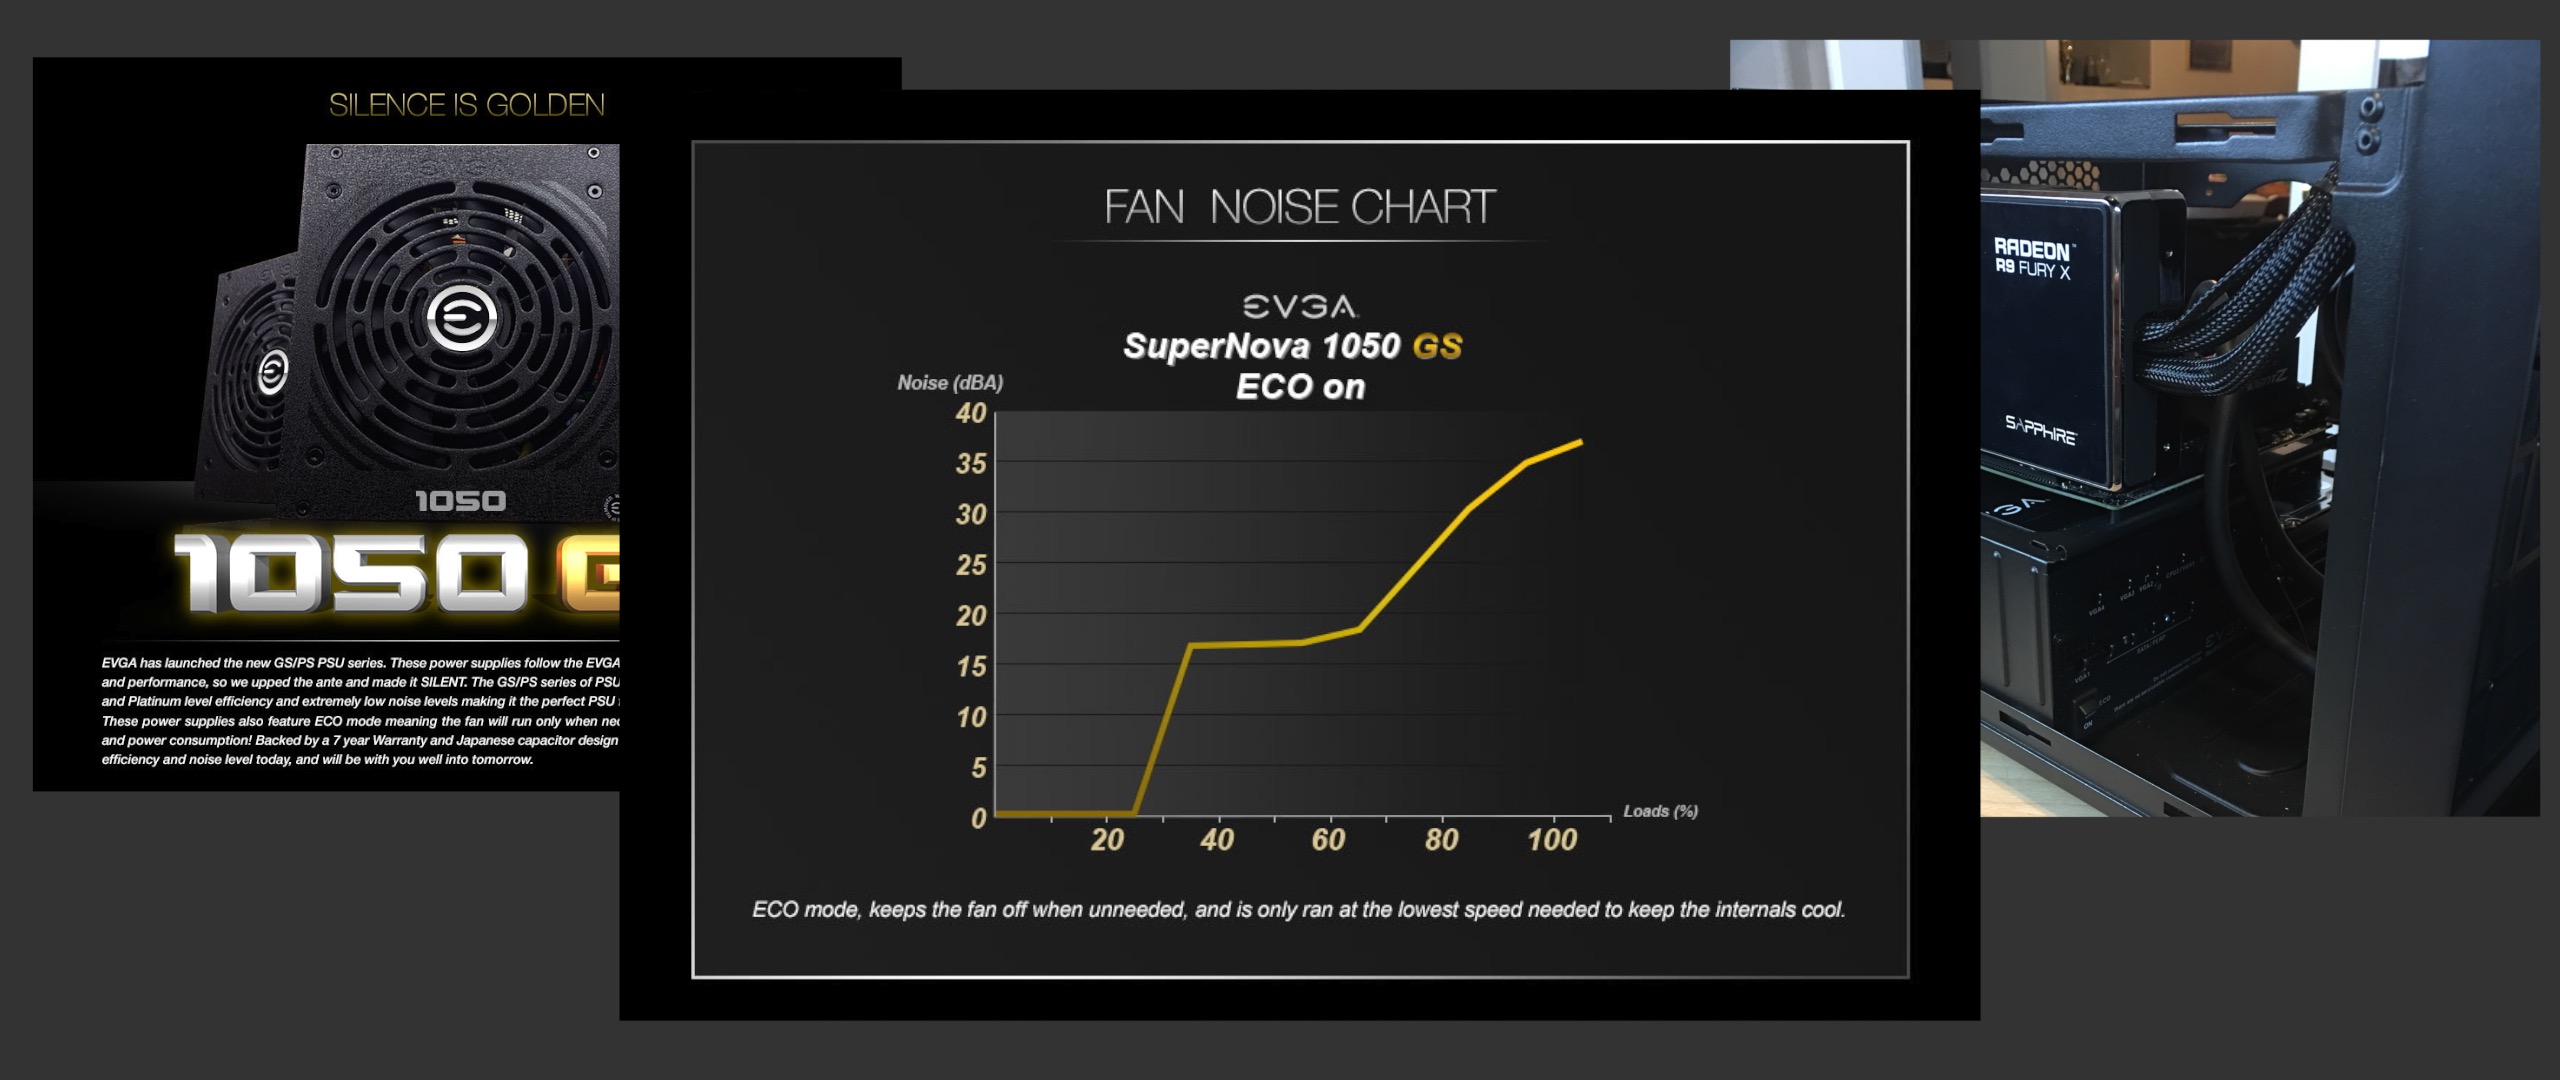
Given that I knew the combination of the Sapphire Fury X and i5-6600K would be a low power draw, I looked for a high enough wattage PSU where the total draw would keep the unit running in a low noise state. I also wanted a small PSU that would fit easily in a Mini-ITX case. I found that the SuperNOVA 1050 GS checked all the boxes.
At 1050 watts, it runs in zero fan mode up to 25% load, which is about 260 watts. From there the fans begin to kick and between 35% to 70% load (365 – 735 watts) the unit only produces 17db of noise. Idle and low stress gaming would keep me in the zero db range, and full load would be well within the 17db plateau.
As with most power supplies, the SuperNOVA 1050 GS only comes with long cables. I found a SuperNova 1050 GS specific cable kit at EnSourced dot net. I reached out to the owner regarding a really short set (20 cm).
He informed me that the unique pin-out of the 1050 GS, could make a short cable a bit of a tangle. The SuperNOVA 1050 GS uses two connectors (an 18-pin and 10-pin connector, totaling 28 pins) which stack on top of each other on the PSU. This plus the fact that you’re splitting and merging wires between the 24-pin and 28-pin ends, creates an odd cable set.
To connect the cables, I attached them first to the PSU, and then installed the PSU, pushing the cables into the cavity. Hooking up the cables was relatively easy, with the short runs working very well.
Sliding the included 3D-printed wire guides (a pretty cool feature) down to the ends of the ATX power cable allowed it to form a more cylindrical twist when connected, rather than a flat helical twist. The cables from EnSourced are sleeved in paracord, and are quite heavy duty.
Drives are easily installed in the tool-less brackets. Simply flex them open, and place the guideposts in the screw holes on the drive. You then slide them in the back of the case. As with the PSU, I found it easier to attach the cables to the drives, and then install them.
Connecting the cables was pretty easy at this point. The front-panel audio and USB 3.0 were run under the Fury X radiator, beside and then across the motherboard. The SATA ports are on the opposite side of the motherboard from the drives. Those cables were run along the bottom with the SATA power cables, and up over the memory.
One nice feature about the Corsair Obsidian 250D is that its front-panel cables are not overly long, as I found with the 380T. They appear to be just the right length, and don’t require any extra work to take up and route slack.
Users browsing this forum: No registered users and 2 guests
You cannot post new topics in this forum You cannot reply to topics in this forum You cannot edit your posts in this forum You cannot delete your posts in this forum You cannot post attachments in this forum