Review - Corsair Obsidian 750D Full Tower Case
Overview
The Obsidian 750D is Corsair’s third new case in the Obsidian line this year. It slots between the 350D microATX chassis and the 900D super-tower. The 750D continues the same elegant styling and refined look of the Obsidian line of cases, which feature brushed aluminum and steel construction.
The case offers an array of cooling configuration options (both air and liquid), and more than a dozen storage bays.
Features & Specifications
- Support for up to 8 fans (3x AF140L fans included)
- Support for a radiator up to 360mm in length (top), 280mm (front), 280mm (bottom)
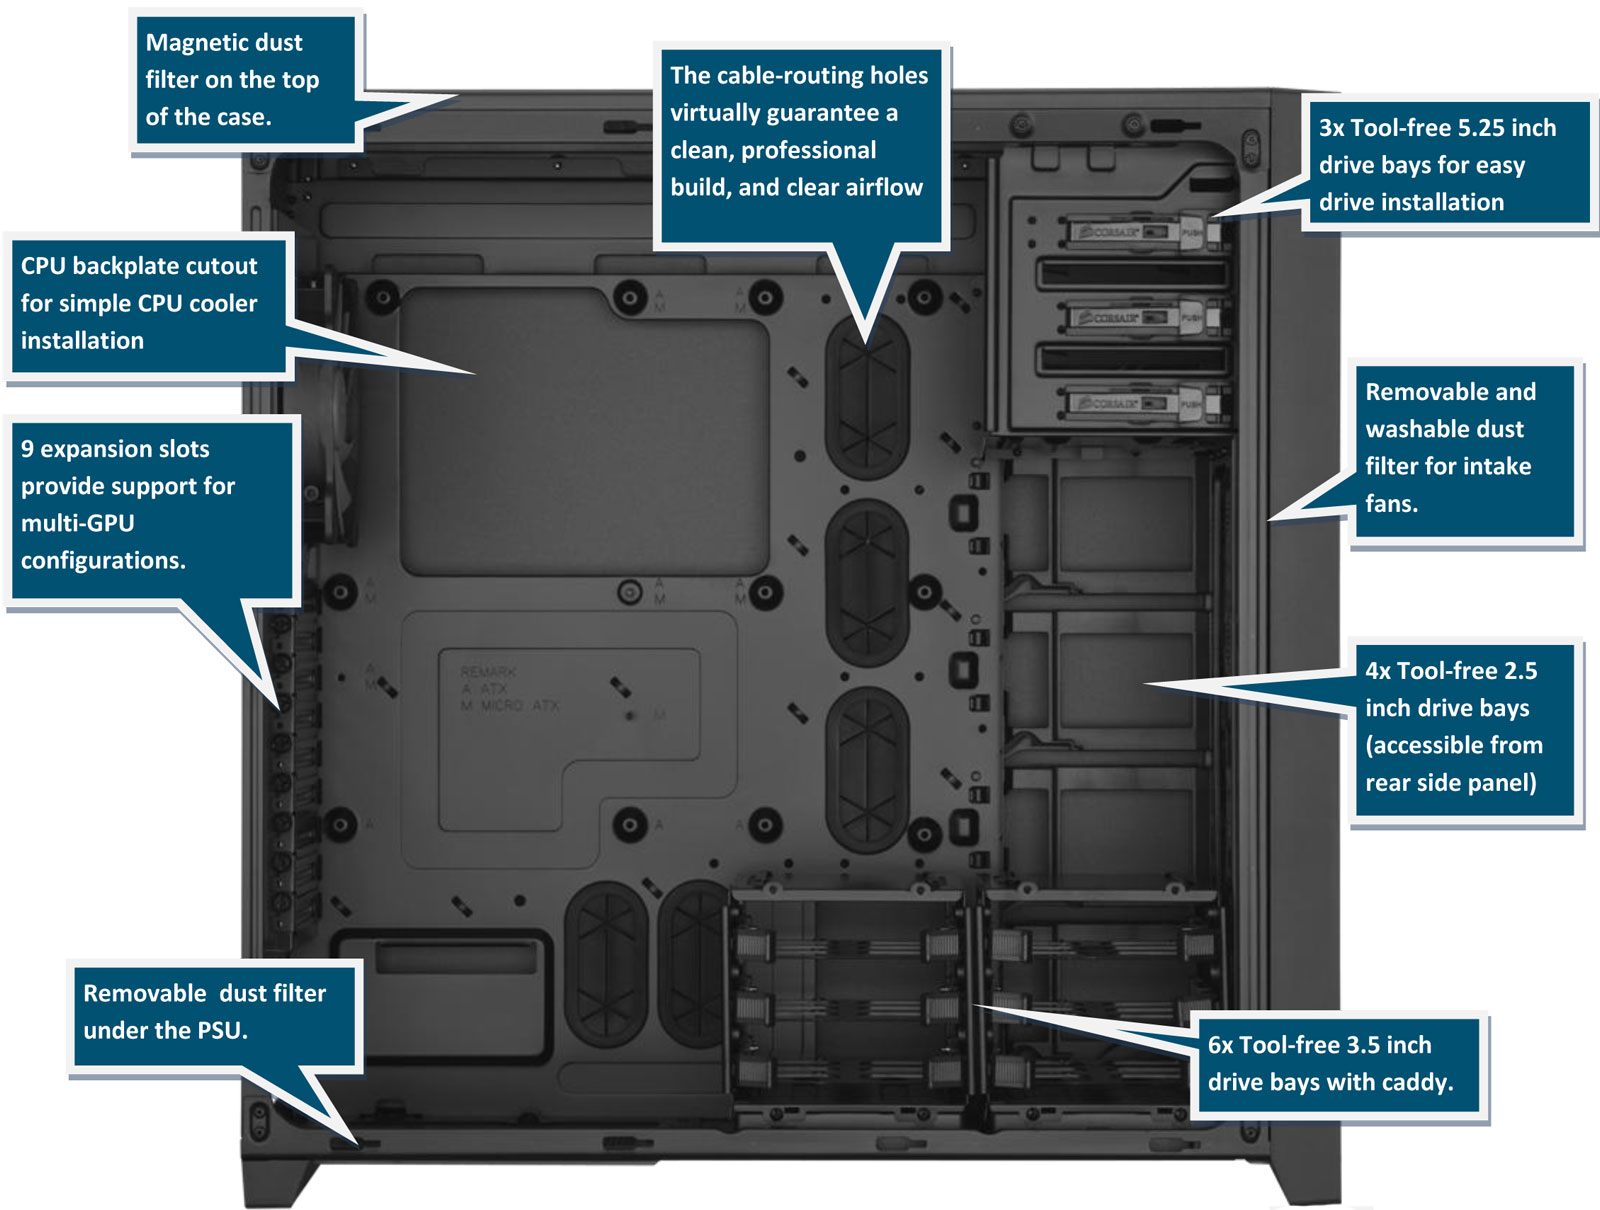
- Cable routing cutouts with rubber grommets
- CPU backplate cut out for easy CPU cooler upgrades
- 3 tool-free 5.25 inch drive bays
- 6 tool-free 3.5 inch hard drive trays with integrated SSD support
- 4 tool-free 2.5 inch SSD drive bays
- 3 removable filters (front intake, under PSU, top of case)
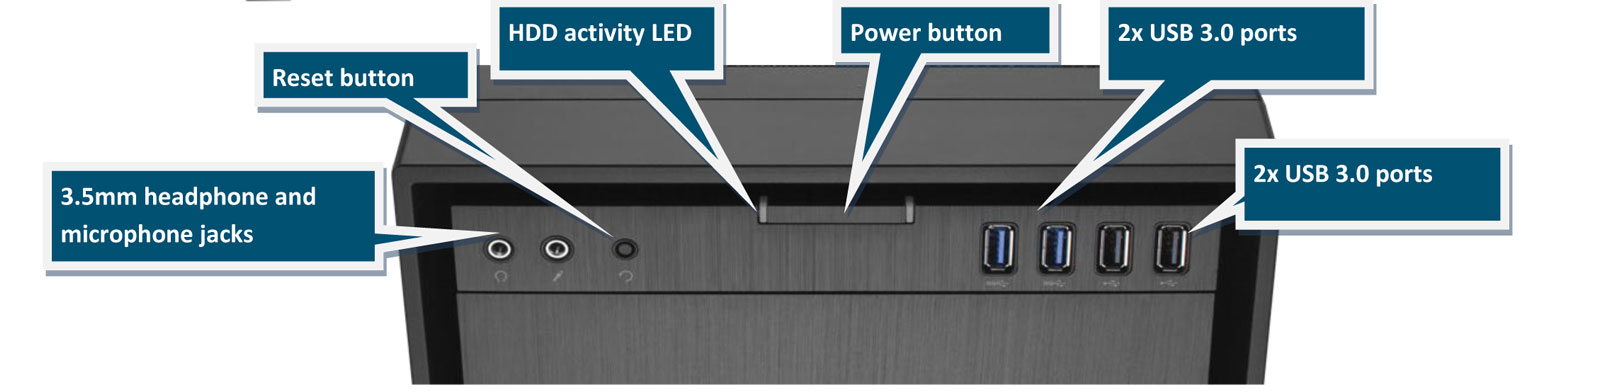
- Front panel has 2 USB 3.0 ports, 2 USB 2.0 ports, headphone and microphone jacks, and power and reset switches
- Thumbscrew side panel removal for quick access
- 9 expansion slots for multi-GPU compatibility
- Motherboard compatibility with microATX, ATX, EATX, XL-ATX
- Matte black interior
- 2 year warranty
Cooling Options
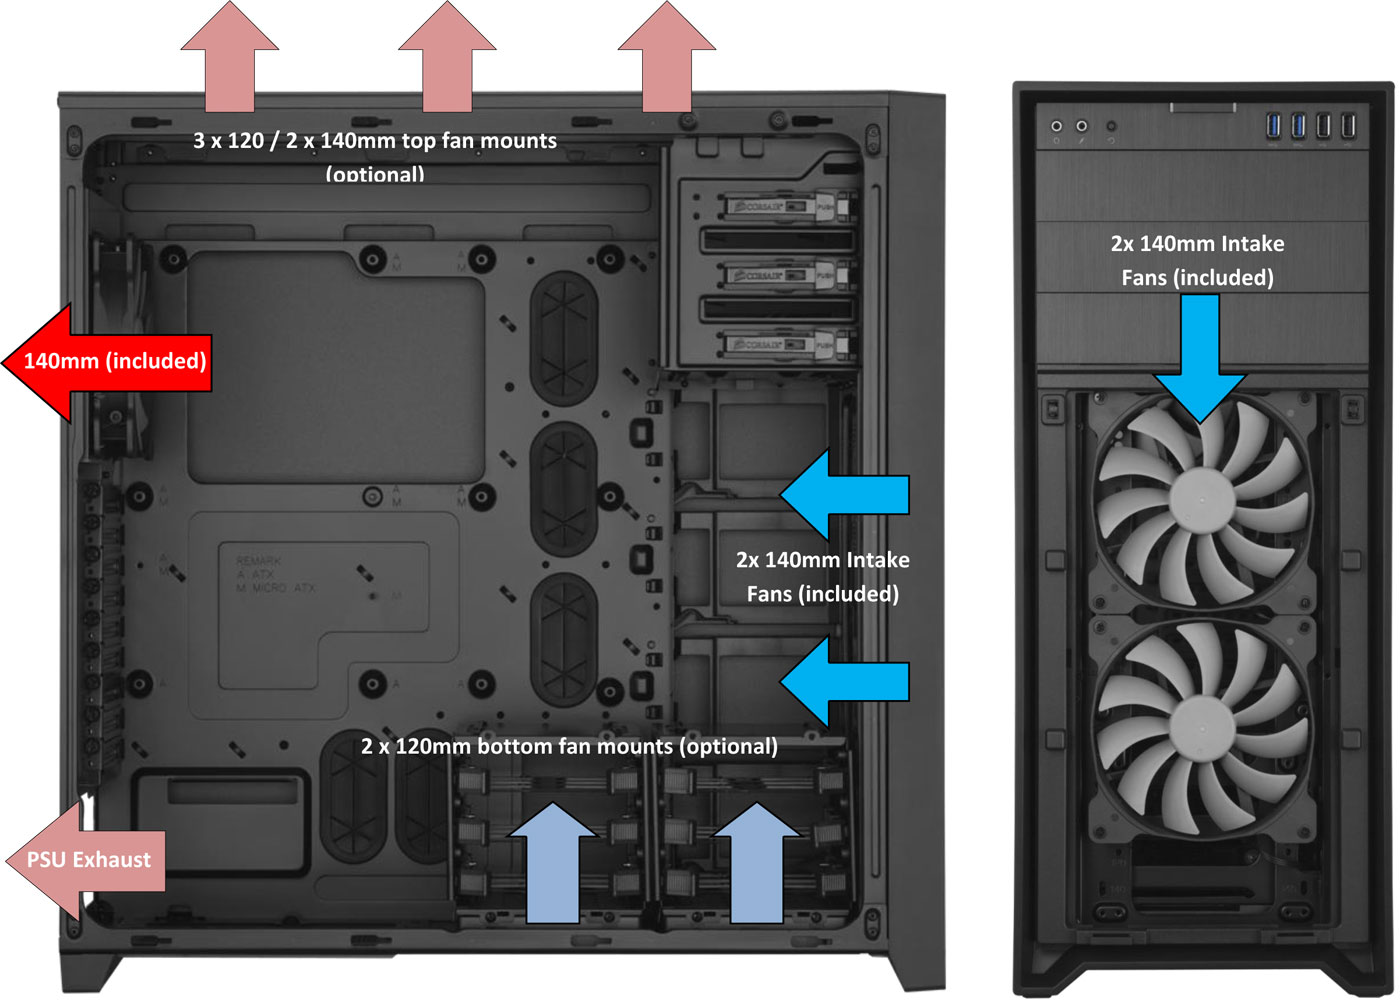
Below are two graphics that outline the extensive cooling options found in the Obsidian 750D. The first image shows the possible fan locations, along with a color-coded air flow diagram. When mounting fans in the bottom location, the HDD cages may need to be removed or relocated.
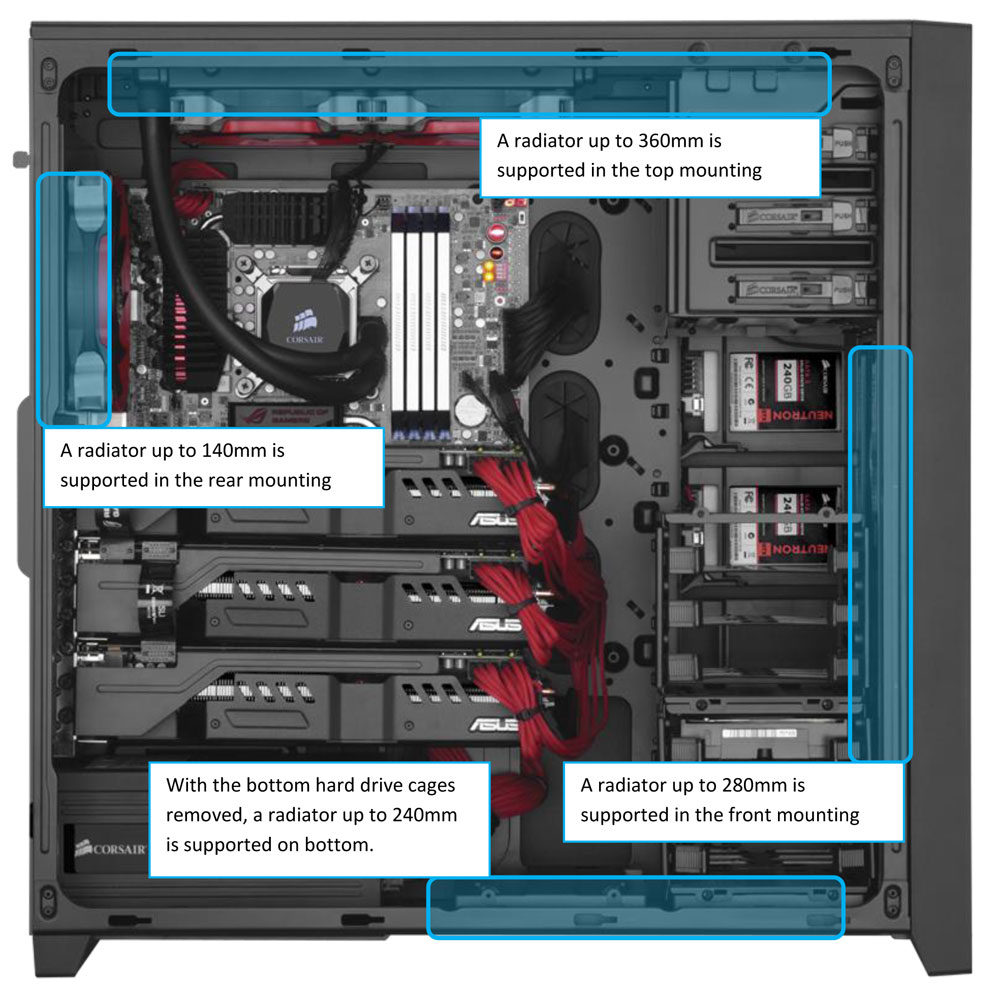
The second image shows the four possible locations of liquid cooling radiators. Four different size radiators are supported: 140mm, 240mm, 280mm and 360mm. As with the extensive air-cooling options, some drive cages may need to be removed to accommodate some configurations.
Unboxing
Upon opening the case I was greeted with the standard Styrofoam inserts, with plastic wrapped around the chassis. What I found once all that was removed was one sleek and sexy black aluminum case. Upon first glance I could immediately see that the quality was top of the line, from the brushed aluminum front plate to just the solid feeling from picking it up and moving it around.
The Obsidian 750D fits it’s naming of a “full tower,” and is by no means small in any way. For a moment I wondered if my desk was tall enough for the case, but a test fitting put those fears to rest.
Coming from a smaller sized case, my initial impressions let me know I have been selling myself short when it comes to getting a computer case. There was a small defect on the top grill where it seems that the adhesive wasn’t sticking fully. I was able to push the grill down, and it seems to be sticking fine now.
Component Inspection
A quick glance at the front panel components shows two standard USB 2.0 ports, two USB 3.0 ports, a microphone and headphone input. Under those inputs lie the drive bays (do people even use optical drives these days?).
In my opinion the drive bay covers make the case look significantly better than if there were any drives installed. The drive fronts would ruin the flow of the case. Below the drive bays sits the front fan housing, which is held in place by two push-in clips. If you push the housing on both top corners the front can be removed which exposes the fans and a protective dust filter.
The top of the 750D has a nice mesh cover as well where additional fans can be placed, to allow for even greater cooling. Something new to me was finding a mesh grill on the bottom of the case (rather than a solid plate), which helps contribute to increased airflow. There is even a removable dust filter below where the power supply would be placed.
At the time I thought all of these dust filters were a bit of overkill. However, I soon learned the error of my ways. When I was moving the components from my old case to the Obsidian 750D new - all of those parts had PLENTY of dust I had to blow out.
Finishing off the case has a standard rear panel that comes equipped with a fan as well. Last but not least was the clear side panel. The giant side window allows for a great view of all the components inside.
The Obsidian 750D’s real standout features came once the side panels were removed and I got to the guts of the case. For anyone who currently has a case and feel where they feel cramped working inside, or if you want flexibility in component placement - this case has you covered many times over.

Viewing the closed side of the case (opposite of the clear window), you will see wires pre run from the front panel to give you an idea of how well you can hide the rest of your wires from view. There are precut areas with grommets giving you multiple options on where and how you can run wires behind the motherboard. Additionally this panel houses removable brackets, which can house up to four 2.5” SSD drives.
This is something that initially caught me by surprise, but with the slim compact design of SSD drives I can see how placing them flat along the side of the case allows for more internal room. When viewing the case with the side panel off, I was able to see all of the placement options for storage in the case.
At the top were three easy access bays for 5.25” devices or drives. The bottom of the case offers six trays for standard 3.5” or 2.5” drives. The trays allow for six drives stacked normally. You can also do a 3x3 arrangement of 2.5” drives.
The thing I liked the most about the trays is how easy they are to remove and handle. Due to their flexible design and preinstalled tabs, inserting drives (with no tools) is as simple as can be.
The storage options at the bottom of the case are a bit of overkill for me. However I know plenty of people who could make use of these storage options. Overall the interior features of the case make it give confidence the installation of components should be a snap.
Review - Corsair Obsidian 750D Full Tower Case (Page 2)
Installation
With all of the space inside the case, and easy to use components, I knew this installation was going to be a breeze.
First off was the power supply, which was as simple in this case as any other case – just 4 screws needed to hold it in. Next was placing my SDD in their housings along the side of the case. The cages for these are simply unclipped out, and then the drives slide in the cages. Voila! Clip the cage back to the case and you’re done.
Next was installing my 3.5” HDD inside of the trays inside. Like I stated earlier this process was a lot easier than I expected since no tools were needed as the drives were held right in place held by the pins.
Once it came to the motherboard install I noticed that the case only came with one motherboard standoff. I am sure this was a minor error, and luckily I had extras from previous case installs. Once everything was installed, then came running the wires and cables behind the motherboard. The cutouts are easy to use, and the hidden wires give the inside of the case a minimal and clean look.
Noise
This Obsidian 750D comes standard with three large 140mm fans. Once powered up, the noise was minimal and almost nonexistent.
Conclusion
This case is designed not only for those who take pride in their computers (and enjoys showing off a bit), but also someone who may just want a clean and elegant looking case. The build quality is excellent and you will certainly feel like you got your money’s worth. The case is solid, and feels like something that would last. In short, it’s an investment that will see you through multiple builds and upgrades.
The space inside this case is more than many people will need to simply hold their components, but that extra space and good design makes things like component installation or removal that much easier. The easy to use options makes swapping drives or other devices quick and (most of the time) tool free.
I really can’t think of a negative aspect of this case. The closest thing to a negative is that the large size makes me want to upgrade my machine, to try and fill up some of the empty space.
Corsair has a full line and wide range of cases on the market. I feel this case is targeted at two sets of users - those with extensive system builds (especially storage), and those who want plenty of space for easy installation and upgrades. If the full tower design is simply too big, the Corsair Obsidian line offers additional Micro-ATX and Mid-Tower variants. Those options offer a smaller size, but retain the easy usage and build quality.
Image Gallery from Review
TL;DR
Positives
- Excellent Styling
- Great Build Quality
- Massive Interior
- Mostly Tool Free Installs/Upgrades
- Great Cable Management
- Insane Storage Options
Positives
- Excellent Styling
- Great Build Quality
- Massive Interior
- Mostly Tool Free Installs/Upgrades
- Great Cable Management
- Insane Storage Options
Neutral
- We Didn't Test Water Cooling
- May Be Too Much For Some Users (Smaller Options Available)
Negative
- None